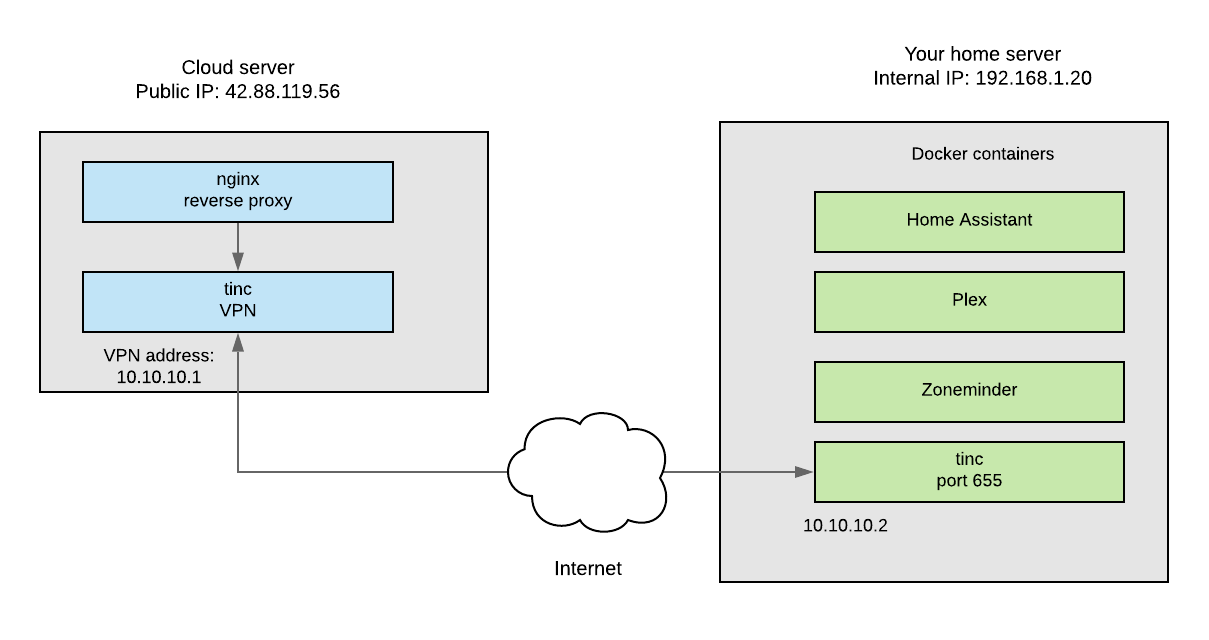
Generally when you have a device in your home that you want to access over the internet from the outside, you need to set up what is known as “port forwarding” on your router. This tells your router to send outside traffic to a particular device which is “listening” on that port. In some cases, this can be a potential security risk because hackers are known to scan public IP addresses looking for open ports. In fact, sites exist that list such ports found through these scans.
Port forwarding is not inherently unsafe, but is only as secure as the software that is in the device receiving traffic on the open port. There have been plenty of news reports of home security DVRs with unpatched or poorly written firmware that are compromised by these types of attacks. Once the device has been breached, it becomes a vector into your network, potentially exposing everything else you have connected. In an ideal situation, your router will have no ports forwarded (open) and thus be virtually invisible on the internet.
For roll-your-own services that reside inside your network, such as Home Assistant, Zoneminder, and Plex, port forwarding is only one aspect of remote access. You will also have to deal with non-static IP addresses and configuring secure certificates. Below I will describe a setup that deals with all of these issues and offers a secure (although somewhat complex) solution to accessing multiple services running on your home network.
Basically what I am proposing is that you create a VPN tunnel from your home Linux box to an inexpensive cloud server. Using subdomains and a wildcard certificate, you can then access your home services on the cloud server through a reverse proxy such as Nginx. Although this is somewhat complicated and there is a small cost involved, it is a very elegant and secure solution to a real problem. I’m not going to write out the entire process in detail, but I will outline the key steps and links to the appropriate articles where you can get more information. If nothing else, this will act as a blueprint for one possible solution you can modify for your own purposes. There will likely be some trial and error on your part, but a final working system such as this is very satisfying!

1. Set up a small Linux server at a cloud service provider such as Digital Ocean or Linode. You can get by with the smallest $5/month or less plan they have. Install an OS such as Ubuntu and secure your server. https://www.linode.com/docs/security/securing-your-server/
2. Install the Tinc VPN on your cloud server and home server, then establish a connection between the two. https://www.linode.com/docs/networking/vpn/how-to-set-up-tinc-peer-to-peer-vpn/ (In this example, it is between two Linode hosts, but just substitute your home server for one of the nodes)
3. Install the NGINX web server as a reverse proxy. https://www.linode.com/docs/web-servers/nginx/use-nginx-reverse-proxy/ Get a custom domain and then set up separate subdomains for each service to point to this new server. (That is often configured through the cloud service provider assuming they also host the nameservers for the domain) For example, you may want to access your Plex server at plex.mydomain.com
4. Using Let’s Encrypt, set up a free wildcard certificate on the cloud server. https://www.digitalocean.com/community/tutorials/how-to-secure-nginx-with-let-s-encrypt-on-ubuntu-16-04#prerequisites
I have not found a lot of great examples of obtaining a wildcard cert. The command that worked for me is below; substitute your domain for “yourdomain.com”
sudo certbot --server https://acme-v02.api.letsencrypt.org/directory -d *.yourdomain.com --manual --preferred-challenges dns-01 certonly
Note that you will need access to your DNS settings to set a txt entry for your domain to prove you own it. Wait at least 15 minutes after you make the entry to continue with the cert process when prompted. If the procedure fails or you need to renew, simply use the same command again.
5. For each subdomain, set up a separate configuration file on the cloud server that tells Nginx how to send the appropriate traffic back through the VPN to the correct service running on your home machine (by specifiying the port that service is running on.) Each service will still be listening on a separate port, but these ports will not be forwarded in your router’s setup and exposed directly to the internet. The file is usually located at /etc/nginx/conf.d/sub.yourdomain.com.conf
Here are a few that worked for me:
Home Assistant: https://www.home-assistant.io/docs/ecosystem/nginx/
Zoneminder: https://blog.haraschak.com/zoneminder-part-2/
Plex: https://github.com/toomuchio/plex-nginx-reverseproxy
You should now be able to access your home services from anywhere using a secure URL without exposing your home network directly to the internet. I’ve found that most issues with this setup arise due to the Nginx configuration scripts. There are plenty of example scripts on the web and with some experimentation you should be able to make them work.